Connecting Sensors to Azure IoT Hub
Recently we started building a solution to provide the teams in our office with useful information regarding our team spaces and conference rooms.
In a “proof of concept”-style we are taking our development team space as a test field.
Besides displaying team performance (sprint burndown) and office resource data (free meeting rooms) one part of the solution is to show room sensor data on a television dashboard.
We determined that following sensor data will be most suitable for an office environment:
- sound level
- temperature
- brightness
- air quality
We purchased/organized the following prerequisites:
- Azure subscription
- Microcontroller ESP8266 (Wi-Fi, GPIO pins)
- Sensors
Steps:
First of all to get started with our IoT Project, we need to setup our environment by configuring Azure resources and prepare our devices. Microsoft offers some help here in form of documentation and example projects. But this should not mean everything works as smoothly as expected. To provide you some help, we put down a brief list of steps to get you quickly started with your first IoT project. The list includes an overview of errors we encountered and how we solved them.
Create IoT Hub, add device, Copy Connection String and Device Id
To create an IoT Hub resource and to add devices you can follow either of these two useful guides provided by Microsoft: [IoT Quickstart], [IoT Get Started]. IoT Hub usage is free for up to 8000 device messages per day (Standard Tier – Free Edition) [IoT Pricing]
Clone GitHub Project
Microsoft hosts several IoT SDK’s on GitHub in different programming languages. With these SDK come useful examples projects like [Microsoft Project]. You can either clone the project via git or download the zip file directly on GitHub.
Insert Wi-Fi settings & Device Connection Data
The Device Id which was created in the previous step must be inserted into the configuration header file (config.h). If you can build and upload the project successfully to the board, the Serial Monitor will prompt you for Wi-Fi SSID, Wi-Fi password and Device Connection String. The board will save this data to the EEPROM, which will keep the settings as a non-volatile store beyond power supply interruption.
Optional: Correct sensor configuration or send dummy data
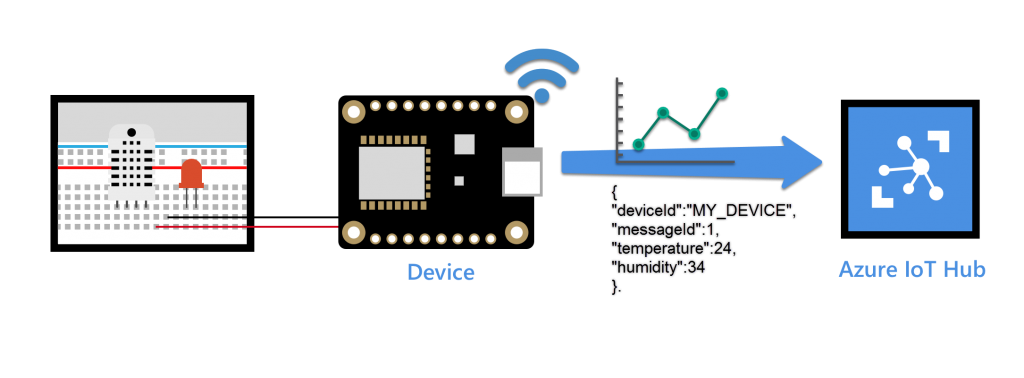
Now that you configured the microcontroller, we have to connect our sensor to the microcontroller and update the connected PINs in the project. All this information should be set in the configuration header file named “config.h”. Here the application provides the option to send real sensor data (via a real DHT humidity and temperature sensor) or to switch to simulated data if you have no sensor connected yet. This can be controlled by changing the constant value for “SIMULATED_DATA” in the configuration header file (config.h).
Optional: Change code to get a running project
Because the project would not start as expected in our case, we were forced to debug the project step by step. Further information you will find in the section below called “Drawbacks”.
Show received data
Microsoft provides two examples/projects to display the received data:
- Device explorer [Device explorer]
- “read-d2c-messages” – Console Application in Azure IoT Samples [Read-D2C-Messages]
Drawbacks and how to fix them:
After successfully completing all the required installation steps, the program needs to be compiled and uploaded to the microcontroller.
Unfortunately the code would not even build using the latest code and up-to-date Arduino library versions and board version in our case.
Because the GitHub project is relatively outdated (last commit 1 1/2 years ago) this does not seem to be a special problem. Also, the provided examples lack documentation about the supported versions. A look into the issues listed in the GitHub project resolved most of our problems:
An extract of occurring exceptions during compilation or execution were:
Arduino.h:137:22: error: expected unqualified-id before ‘(‘ token
#define round(x) ((x)>=0?(long)((x)+0.5):(long)((x)-0.5))
- The Arduino header file of the esp8266 library contains an invalid duplicated reference to the round function, which needs to be fixed manually in the header file. Commenting out the line will fix this issue temporarily.
“Open HTTP connection failed (result = HTTPAPI_OPEN_REQUEST_FAILED)”
- Don’t use the HTTP protocol, it does not seem to be supported any more. Use the MQTT protocol instead. To do that include the MQTT Header file (“AzureIoTProtocol_MQTT.h“) and change the protocol type in the method “IoTHubClient_LL_CreateFromConnectionString“.
“Fatal exception 28(LoadProhibitedCause)” …followed by a stacktrace
- The read and write operations for WiFi and IoT Hub connection seem to be poorly implemented and need a programmatic refreshment. Instead we hardcoded the connection parameters for now. In long sight writing these settings to the EEPROM is the saver choice.
- Recurring stack errors could be resolved by using the specific version of the board (2.4.0)
- Use the latest version of the required libraries (finally used libraries and board versions are listed below)
Board: esp8266
Version: 2.4.0 (Most recent version 2.6.1 – don’t use!)
Library versions:
| AzureIoTHub | 1.0.45 (most recent version) |
| AzureIoTUtility | 1.0.45 (most recent version) |
| AzureIoTProtocol_MQTT | 1.0.45 (most recent version) |
| ArduinoJson | 5.13.5 (most recent version: 6.11.1) |
| DHT sensor library | 1.3.4 (most recent version) |
| Adafruit Unified Sensor | 1.0.3 (most recent version) |
All recent versions listings are as of 28 June 2019
Things to keep in mind:
- The EEPROM offers a good option to save secrets, but not to save state in some way, because of the limited write/erase cycles (100.000 cycles [EEPROMWrite]).
- If you plan to use multiple sensors with one the microcontroller, consider selecting microcontroller with multiple analog output pins if you need them for more detailed sensor values.
If you don’t have any sensors and microcontrollers yet, you can mock sensor data with a console application or a web interface.
- “SimulatedDevice”- Console Application in Azure IoT Samples [Simulate Sensor]
- Raspberry PI Web Simulator [RPi Web Simulator]
Outlook
The next steps will include the collection and analyzation of sensor data from IoT Hub by using other Azure Resources like Time Series Insights or Stream Analytics and the programmatic consumption of sensor data by using defined IoT Hub endpoints. This and other topics will be part of upcoming blog posts.
Sources:
[IoT Get Started] https://docs.microsoft.com/en-us/azure/iot-hub/iot-hub-arduino-huzzah-esp8266-get-started
[IoT Quickstart] https://docs.microsoft.com/en-us/azure/iot-hub/quickstart-send-telemetry-dotnet
[Microsoft Project] https://github.com/Azure-Samples/iot-hub-feather-huzzah-client-app
[Device Explorer] https://github.com/Azure/azure-iot-sdk-csharp/tree/master/tools/DeviceExplorer
[Read-D2C-Messages] https://docs.microsoft.com/en-us/azure/iot-hub/quickstart-send-telemetry-dotnet#read-the-telemetry-from-your-hub
[Simulate Sensor] https://docs.microsoft.com/en-us/azure/iot-hub/quickstart-send-telemetry-dotnet#send-simulated-telemetry
[RPi Web Simulator] https://azure-samples.github.io/raspberry-pi-web-simulator
[EEPROMWrite] https://www.arduino.cc/en/Reference/EEPROMWrite
[IoT Pricing] https://azure.microsoft.com/en-us/pricing/details/iot-hub/


